Blyth St Mary and St MartinArchaeology
 Plan, dated 1925 Plan, dated 1925 |
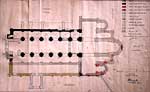
The east end of the church was excavated in 1923-5 and its plan recovered. It consisted of a central apse flanked by aisles that ended in apses internally but were probably square on the outside, and there were apses to the transepts, creating an east end of apses en echelon. The south wall of the transept was also exposed in line with the corner of the wall still remaining, and the shaft buried in the wall identified as being from a doorway of three orders. The main apse had been found in 1857. From this evidence it is clear that the church followed the plan adopted in 11th-century Normandy in which the east end consisted of a single bay before the apse, and not the plan more commonly used in England in which east ends were longer and had several bays.
The great arch from the nave into the crossing has a heavy roll moulding flanked by two smaller ones, supported on shafts with shallow volute capitals like those of the nave. The eastern shaft and capital are now buried in the later consolidating brickwork although the outer orders of the arch can still be seen above it.
The spur of the west wall of the transept is retained on the north side of the building, next to the site of the monks’ processional door from the cloister into the church. The original Norman aisle window and the single level of string course is still in place but what was probably an elaborately carved doorway has been removed and replaced by a simple 19th-century door frame. There is no trace of a second door into the aisle from the cloister further west. Four massive buttresses have been added to prevent the collapse of the aisle wall which was reduced in height when the gallery level above its vault on the interior was removed. The two round arched recesses in the wall, which were found to contain animal bones in the 1920s, would have been covered by the roof of the cloister alley originally and would probably have contained the burials of abbots or senior monks. The eastern recess has a roll-moulding to its arch whereas the western one is square-cut and neither has a medieval tombslab.
A great deal of Norman masonry is present in this wall, with some of the facing stones in place, although the original pilaster buttresses have largely been robbed out and there has been a great deal of disturbance of the masonry. There is a scar from a later roof which would have covered over the medieval windows. After the first, east, bay the spacing of the buttresses does not line up with the responds on the inner face of the wall, since they were probably related to the cloister arcades rather than to the interior bay spacing. There is no evidence that the cloister was ever vaulted.
The exterior masonry at the west end of the north aisle is Norman work and completely plain, apart from a single section of string course and the shallow clasping buttress at its corner and there is no evidence for a doorway or a window, apart from one tiny round headed light. This is because most of the space is taken up with a projecting block of masonry behind the tower buttress that contained a newel stair, but was capped off when the tower was built. The interior of it was investigated in the 1920s and Roman brick found to have been used for the barrel vault of the passageway that led into the stair. A second such stair turret also existed on the south side although it was removed when the west tower was built, and the arch into the stair passage can still be seen on the interior of the church.
The west front of the Norman church will have been on the model of St-Georges-de-Boscherville in Normandy, that is one without west towers, but with tall projecting stair turrets flanking two or three tiers of round headed windows above a main portal either beneath a large arch, or more probably, set in a flat wall. This design was also used for the facade of Tutbury Priory in Staffordshire in the 12th century, although, as here at Blyth, the facade has been modified since and a tower added.
The nave interior was of seven bays, with the western one now occupied by the later tower. It originally had a three-storied elevation covered by a wooden ceiling beneath the roof. The arcade consists of simple square-cut arches of two orders, on compound piers with half-shafts and capitals, except at the east end where the responds are simple large half-shafts with cubic capitals. Above this the gallery arches repeat the design although with simpler piers. On the north side the gallery has been removed and post-medieval windows built into the blocked arches. On the south the whole Norman aisle, its vault and the gallery above, were swept away when the aisle was enlarged in the later period, and the gallery arches were left open. At the top of both north and south walls there is a clerestorey of single windows under square-cut arches supported on little shafts and capitals on the interior with a plainer exterior. It lacks the wall-passage usually found in Norman clerestories. The nave pier capitals are the characteristic volute ones of the early-Norman period and reflect the designs used in the monks’ native city of Rouen, although here made more ornate by the addition of little masks, or shields in the centres. Some capitals nearer the east end have a central T shaped section and the volutes are omitted, making them similar to those of St John’s chapel in the Tower of London. Cushion capitals are used for the clerestory, with the occasional volute or scalloped one included as well. The masons’ marks indicate a continuity of building between the lower and upper levels of the wall, disputing the idea that the clerestorey is a later build.
The bay divisions are marked by full length shafts that originally supported the ceiling, but were modified by the 13th-century vault builder to provide the springing for the vault ribs. The shafts stand against dosserets and there is a distinction between the pair of piers to the west of the wooden screen and all the rest. On these piers the dosseret only starts above the level of the capital, so that the pier beneath has a flat section. There is also a subtle difference in the nave architecture at this point that affects all the piers to the west, in which the abaci of the pier capitals stop short and do not continue across the long shafts as annulets, unlike the those of the piers to the east where they do. Both of these differences can be attributed to the way the building was used, and indicate the distinction between the monastic and lay parts, with the latter less ornate. It is usual in monastic churches to have a pulpitum, or screen sited at the end of the second or third bay to the west of the crossing to separate the monks' part of the church from that of the laity and this is likely to have also been the case at Blyth. At a later date, probably when the parish took over more of the nave, the pulpitum was removed, and the full height wall, on which the Doom painting can be seen, was built two bays further east. The stonework of the lower parts of the nave shafts has been replaced on both north and south piers, in the relatively recent past, and may have been left in a damaged state when the pulpitum was taken down. A division at this point would have given the monks three bays of the nave, in which their choir stalls would have been placed, and the parish would have had the remaining four bays, with their high altar on the west side of the pulpitum.
The side aisle on the north is covered by groin vaults with transverse arches between the bays, supported on square-cut pilasters, although the two east bays, now used as vestries have had their vaults removed. The transverse arches are stilted because the aisle bays are rectangular rather than square and it is clear that the builders had difficulty constructing the vault. The vault web is not only irregular, its builders also had to cope with problems where it met the walls. On the outside wall the vault springs from two courses of ashlar voussoirs, but on the backs of the nave piers the voussoirs are steeper and the vault sits awkwardly across the square-cut stones. Since the south aisle vault has been taken down most of the evidence for its construction has been lost, except in the western bay where the line of the vault web can be seen on the end wall and the springing remains on the back of the pier.
The fabric of the church is Magnesian Limestone, probably quarried near Roche Abbey to the north. The stonework of the Norman church is roughly shaped with the wide mortar joints characteristic of early post-Conquest work in England and the roughness of its finish is widely commented upon. This roughness, however, does not extend to the capitals which are taken to a much higher degree of finish and it is evident that the plain walling was originally covered over. The walling now hidden above the vault, but once visible inside the church, still has its original Norman surface, and this is limewashed and painted with red lines to indicate masonry joints. Traces of this survive on the ground floor as well and can be found in the west bay of the north aisle. It is also visible on the capital and shaft of the most easterly pier on the south side, which can be seen behind the screen in the parish aisle, and the capital is ornamented with a delicate foliage trail. The style of the capital painting dates it to late 11th-century. Traces of pigment are also present on two capitals of the south arcade.
The arch from the north aisle into the transept is different to the square-cut arches used for the nave and has a single roll-moulding on the angle, doubtless reflecting a more elaborate treatment of the parts of the church further east that were liturgically more important. A piece of stone in the loose stone collection in the church probably also came from the east end. It is a small voussoir with a version of the triple roll moulding of the crossing arch and may have come from a doorway in the transept.
The wooden ceiling of the nave was replaced by a quadripartite rib vault without wall ribs around 1250. The roof bosses have sophisticated stiff-leaf foliage carvings, including a very splendid dragon on one and a Green Man on another, and are the work of masons influenced by the 13th-century work at Lincoln. In particular the masons here have reproduced the unusual feature of including a miniature carved boss at the apex of the transverse arches which is only otherwise seen in the early-Gothic work at Lincoln. The bay next to the Doom painting retains some medieval painting, with a stencilled pattern of little flowers on the web and traces of pigment around and on the bosses. More colour survived in the 19th century when gold stars and flowers on a blue ground were noted. On the vault immediately above the head of Christ is the remains of a broad band of decoration that took the form of roundels within a double border against a red background.
When the south aisle was widened in the late 13th century the decision was taken to include the south transept within the parish’s part of the church, although it would normally have been a section reserved for the monks, and a two-bay arcade was opened through the transept wall. The arch from the original aisle was remodelled so that one jamb (partly medieval and partly restored) was used to support one of the two arcade arches and the other jamb was taken down and moved to the other end of the arcade. Although this new arrangement would have given the laity more space in the church it would not have allowed them into the crossing area or the area of the monks’ choir or high altar. A reconstruction of the layout of the church at this date would place the choir-stalls of the monks in the crossing area and the bay at the end of the nave, very much like the situation still to be seen at Gloucester where the back of the stalls closes off the end of the transept at the crossing. Since the monastic buildings lay to the north of the church and the nightstair from the monks' dormitory to the church would be in the north transept, the new arrangement would have made little difference to the monks, although they would have sacrificed two bays of the nave. After the Dissolution, when the transepts were taken down, a blocking wall was built behind the arcade which has left its arches and octagonal pier visible on the interior.
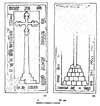
The west tower is built within the last bay of the nave and is enclosed by its aisles, fitted between the two Norman stair turrets of the original west facade, but slightly off-set to the south. To maintain access to the centre of the nave the masons built a second full-sized tower arch from the south aisle, and to ensure the tower’s stability, the wall across the end of the nave arcade is made longer and projects further into the aisle than the one on the north side. The small south door that is mostly used as the entrance to the church was probably also built at this time. The tower itself is a tall structure with slender stepped buttresses and a delicate openwork parapet above the very large single belfry openings of the upper stage. The west facade has a three-light Perpendicular window set within deep jambs and there are three canopied image niches surrounding it. The west door has an ogee moulding with heavy crockets and tall finials linked by a battlemented frieze. The tower stands comparison with that of Tickhill church nearby in South Yorkshire, with which it shares the same lofty proportions, openwork parapet, and canopied niches.
Medieval Cross Slabs
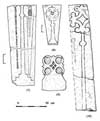
 Slabs 1 and 4 Slabs 1 and 4 |
 Slabs 2-3 Slabs 2-3 |
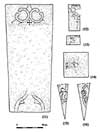
 Slabs 5-6 Slabs 5-6 |
 Slabs 7-10 Slabs 7-10 |
 Slabs 11-16 Slabs 11-16 |
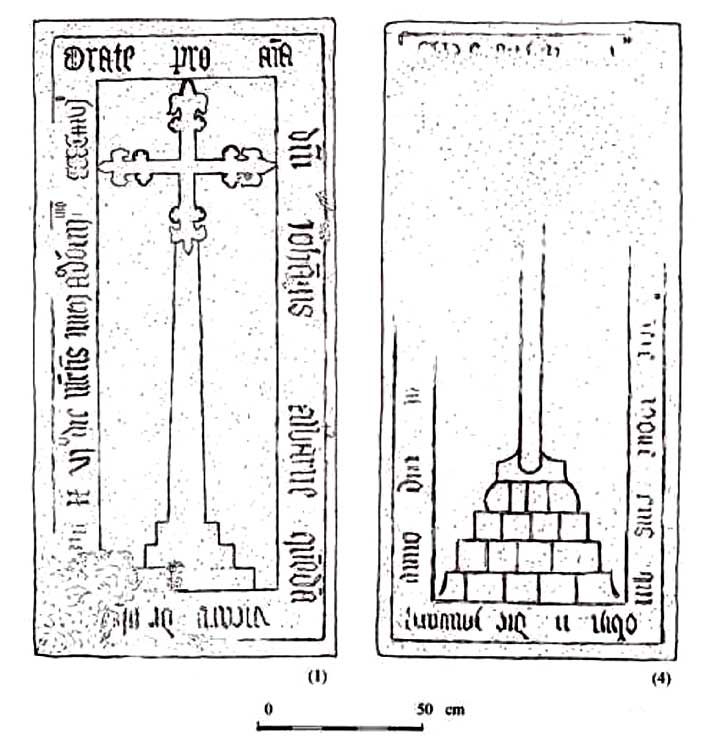
(1) Cross slab floor stone at south-east corner of south aisle. Straight-armed cross with fleur-delus terminals rising from simple stepped base, black-letter marginal inscription: Orate pro aia dni johanis Albarne quoda vicarii de……ii vi die mens ….Adom m CCCC LXXVI John Albarne was vicar of Blyth 1466-1476.
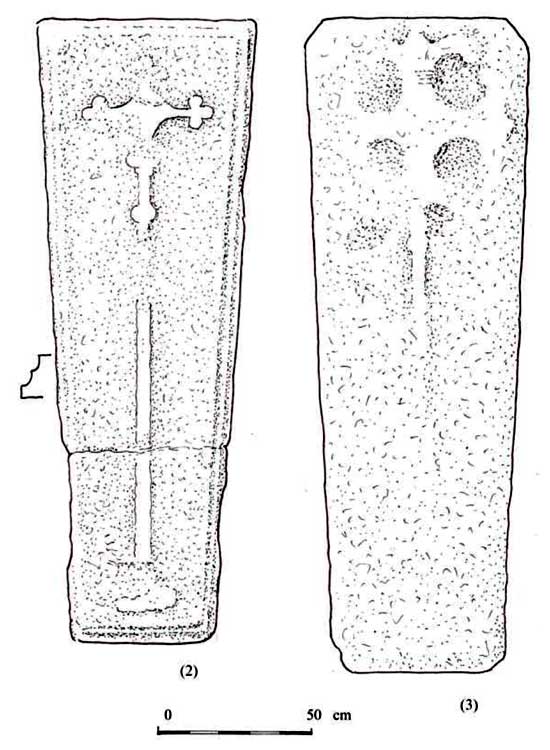
(2) Slab beneath north arcade, between second and third piers from the east. Tapering slab of Portland marble with double hollow chamfer to edge, much decayed cross botonée with trefoil terminals, in relief, with disc near top of shaft, base form not clear.
(3) Slab between third and fourth piers of arcade. Broader slab, again apparently of Portland marble, but even more decayed; just enough survives to show that the cross, in relief, has had a round-leaf bracelet head with cross bands.
(4) Floor stone between fourth and fifth piers of arcade. Cross shaft rising from ‘masonry’ base but head completely worn away, black-letter marginal inscription, ‘…eius qui obit ii die January anno dni…’ remains visible.
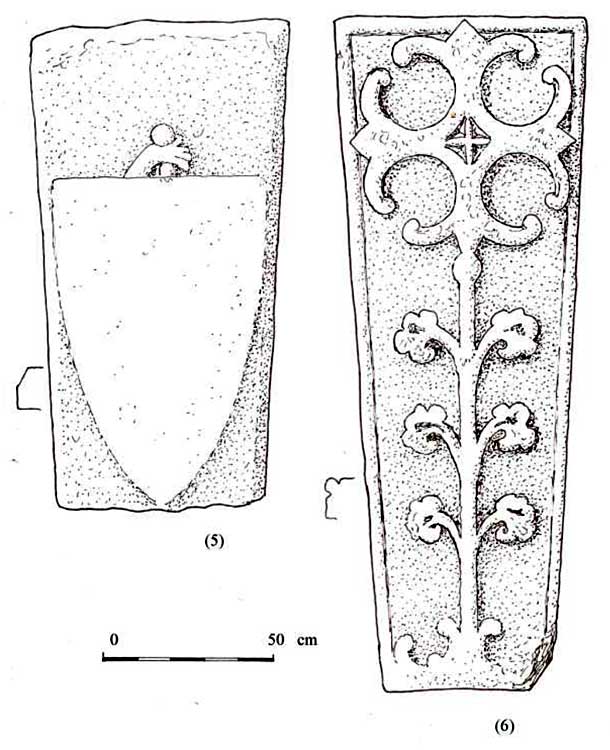
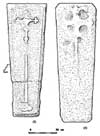
(5) Set upright against north wall of tower, at west end. Relief-carved tapering slab with a large plan shield, with rather bizarrely projecting above its centre the pommel of a sword clasped by a hand.
(6) Set upright against the north wall of the tower alongside (5), a high-quality limestone slab with a round-leaf bracelet cross, in high relief, with here pairs of curled leaves springing from its shaft and an unusual base (cf Teversal (4) made up of a pair of upturned bracelets.
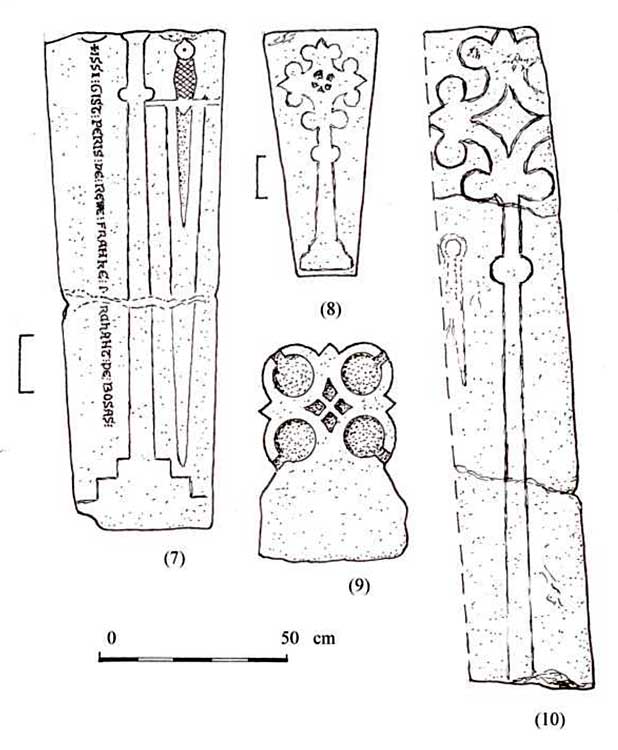
(7) Set upright alongside (6), tapering slab that has lost almost all its head; incised design, cross rising from stepped base and a fine sword, with a cross-hatched hilt and a grooved blade, on the r. On the l. is an inscription, in small Lombardic letters: ISSI:GIST:PERIS:DE:REWE:FRANKE:..RCHANT:DE:BOSAS (here lies Peris de Rewe, Frenchman, merchant of Bosa
(8) On floor against north wall of tower, small tapered slab with incised cross, open bracelets with round leaf, and spiral motif at centre, rising from base with two rounded steps.
(9) Loose at north-east corner of tower, headstone with cross of four broken circles, carved in relief, with sunk centre divided by saltire cross, extrados shaped to the four circles and pointed buds between, but reverse plain.
(10) Slab now forming threshold of west door of tower, incised design, quite crude round-leaf bracelets cross with shears on l. of shaft.
(11) Large (2.07 m long) tapering slab in the floor between the third and fourth piers of the south arcade. Incised design, only c 0.40 cm of which survives at each end, the central section being worn smooth by the passage of feet. Round-leaf bracelet cross head with a small straight-arm cross (its arms ending in circular indents, like a consecration cross) at its centre; trefoiled and cusped ogee arch base. What is particularly interesting is that the cross head is very typical of the late 12th/early 13th century and the base characteristic of the 14th century. Presumably this is a 14th century slab that for some reason specifically copies an older cross head design, a warning against too much reliance on stylistic dating!
Slabs (12), (13) and (14) are re-used high in the internal face of the east wall of the south porch. All are of yellow Magnesian Limestone.
(12) At north end of wall partly covered by a timber shaft carrying the roof. Incised round-leaf bracelet cross with ball at head of shaft.
(13) 1.5 m from north end of wall and 0.30 m below eaves, a fragment of an incised slab with one five-lobed leaf terminal of a cross head and a fragment of another.
(14) In centre of wall 0.5 m below the eaves; slab 0.48 m square with faint traces of four-circle or bracelet cross, with eight small chip-carved panels at centre.
(15)-(18) are sections of slabs re-used as treads in the tower stair, (15) and (16) face down and (17) and (18) face up; they are numbered from the base of the stair, as they appear in the roof.
(15) The 20th slab, incised design, round-leaf bracelet cross with ball at head of shaft and sword on l. of shaft.
(16) The 23rd slab; cross head apparently with fleur-de-lys terminals, shears on l. of shaft.
 Slabs 17-20 Slabs 17-20 |
(17) The 52nd slab. Section of incised cross shaft.
(18) The 63rd slab; at level of door into Ringing Chamber. Section of incised cross shaft with a corner of its base, the form of which remains unclear. (in addition the 27th slab has a single incised line on its underside)
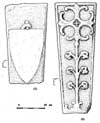
(19) Slab re-used in the extrados of the nave vault, on the south side against the west wall (ir one enters the roof void from the ringing chamber and scrambles down to the r; the stone is immediately underfoot; take a brush! Discovered in January 2003 and illustrated on website1; drawn from that photograph. A splendid stone, probably of 12th century date. Relief design, eight-armed cross with ring at centre, fleur-de-lys terminals with long drooping leaves, big five-lobed leaves springing from shaft
(20) Small discoidal headstone with cross pate, drawn by R.Blair in 19012, present whereabouts
uncertain.
|